Spring Boot Config Client for Server with vault backend
Spring Boot Config Serverでvaultの設定ファイルを取得し、そのserverに対して設定ファイルを取得しにいくclientのサンプルです。
- イメージ図

- vaultのtokenをbootstrap.ymlファイルに追加
spring:
  cloud:
    config:
      token: your-vault-token
- controllerクラスでvaultに保管しているファイルの値をconfig server 経由で取得
package com.example.configclient.controller;

import org.springframework.beans.factory.annotation.Value;
import org.springframework.cloud.context.config.annotation.RefreshScope;
import org.springframework.stereotype.Controller;
import org.springframework.web.bind.annotation.RequestMapping;
import org.springframework.web.bind.annotation.ResponseBody;

@Controller
@RefreshScope
public class ConfigController {
    @Value("${foo}")
    private String vaultFoo;

    @Value("${baz}")
    private String vaultBaz;
    @RequestMapping("/show/vaultconfig")
    @ResponseBody
    public String getVaultConfig() {
        String config = String.format("vault:foo=[%s], baz=[%s]", vaultFoo, vaultBaz);
        return config;
    }
}
- serverで取得した時のvaultの値
{"name":"app-config","profiles":["default"],"label":null,"version":null,"state":null,"propertySources":[{"name":"vault:app-config","source":{"foo":"bar"}},{"name":"vault:application","source":{"baz":"bam","foo":"bar"}}]}
- clientから設定ファイルを取得

コードは、アップ
github.com
Spring Boot Config Server with vault backend
ローカル環境でvaultサーバを起動
昨日、試したので、
tomotaka.hatenablog.com
Spring Boot Cloud Config Server
コードは、gitにアップ
github.com
すごく簡単です。application.ymlの設定にvaultを追加するだけ(gitは、無効に)
server:
  port: 8888
spring:
  cloud:
    config:
      server:
#       git:
#         uri: file:${HOME}/config-sample
        vault:
          host: 127.0.0.1
          port: 8200
          scheme: http
          backend: secret
          defaultKey: application
  profiles:
    active: vault
vaultに必要なデータを書いておきます。
以下のようにコマンドからwriteできます。
vault write secret/application foo=bar baz=bam
vault write secret/app-config foo=bar
vaultにデータを追加するのもhttpを使用してできます。
それもSpring Bootで試してみました。
github.com
これも、とても簡単にできました。(productionで使う場合は、さらに考慮が必要ですが)
@SpringBootApplication
public class SpringVaultSampleApplication {
    private static Logger logger = LoggerFactory.getLogger(SpringVaultSampleApplication.class);

    public static void main(String[] args) {
        SpringApplication.run(SpringVaultSampleApplication.class, args);
    }

    @Bean
    CommandLineRunner commandLineRunner(VaultTemplate vaultTemplate) {
        return x -> {
            vaultTemplate.write("secret/hello", new Hello("world"));
            VaultResponseSupport<Hello> hello = vaultTemplate.read("secret/hello", Hello.class);
            logger.info("vault value is [{}]", hello.getData().getVault());
            VaultResponse response = vaultTemplate.read("secret/hello");
            logger.info("vault json response is [{}]", response.getData());
        };
    }

    public static class Hello {
        String vault;

        public Hello(@JsonProperty("value") String value) {
            this.vault = value;
        }

        public String getVault() {
            return vault;
        }
    }

}
curlコマンドで、vaultの値を取得。ここでのyour-tokenは、サーバを起動した時にコンソールに表示される値を使用
curl -X "GET" "http://localhost:8888/app-config/default" -H "X-Config-Token: your-token"
出力される値に、applicationと、上記のcurlコマンドで指定したcpp-configの2つが取れるのは、application.ymlのdefaultKey: applicationと指定しているからのようです。

helloのデータを取得する場合
curl -X "GET" "http://localhost:8888/hello/default" -H "X-Config-Token: your-token"

HashiCorp Vault Server of dev
install
以下のページに記載しているようにしてインストール
just follow the below guide
https://www.vaultproject.io/intro/getting-started/install.html
- make directory to install vault server.
serverをインストールするためにdirectoryを作成
mkdir valut-server
download zip from Download Vault - Vault by HashiCorp and unzip
vaultを上記サイトよりダウンロードして、上記の作成したvault-server directoryにunzip
cd vault-server
unzip vault_0.9.1_darwin_amd64.zip
- set path for vault and see where vault is
vaultにパスを通して、パスを確認
export PATH=$PATH:/Users/tomo/vault-server
source $PATH
which vault
vault version

- start vault server for development
vault server を開始 (開発用モード)
vault server -dev
- vault client on another shell
vault clientをサーバとは、別のシェルで開始
export VAULT_ADDR='http://127.0.0.1:8200'
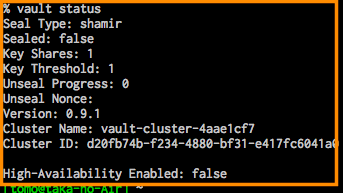
vault status
- write secret
vault write secret/hello value=world
- read secret
vault read secret/hello
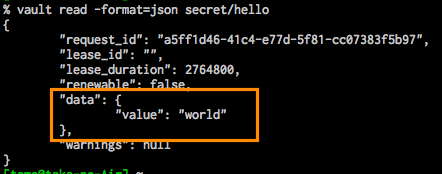
- read secret for json
vault read -format=json secret/hello
Spring Boot Validation and to customize Error Message
Spring Boot で画面の入力チェックとエラーメッセージの表示を実装
Spring Boot Version 2.0.0.M7で実装してみました。
エラー時の画面サンプル

- Formクラスにチェックしたい制約アノテーションをつける
@ NumberFormatで、フォーマットしてくれて便利
String型以外の項目は、RequestをFormクラスに変換する時にエラーを検知して、BindingResultにエラーが追加
なので、以下のmessages.propertiesで、typeMismatchが先頭についているエラーとなっているよう
public class PersonForm {
    @NotEmpty
    private String firstName;

    @NotEmpty
    private String lastName;

    @Max(100)
    private Integer age;

    @Past
    @DateTimeFormat(pattern = "uuuu-MM-dd")
    private LocalDate birthDay;

    @Digits(integer = 10, fraction = 0)
    @NumberFormat(pattern = "#,###")
    private BigDecimal salary;
... setter and getter
@Controller
@RequestMapping("/person")
public class PersonController {
    private static final Logger logger = LoggerFactory.getLogger(PersonController.class);

    @ModelAttribute
    public PersonForm setUp() {
        PersonForm personForm = new PersonForm();
        // set init value
        personForm.setFirstName("first Name1");
        personForm.setLastName("last name1");
        return personForm;
    }

    @RequestMapping("/")
    public String home() {
        logger.info("home");
        return "/person";
    }

    @PostMapping("/valid")
    public String valid(@Validated PersonForm personForm, BindingResult bindingResult) {
        logger.info("person valid");
        bindingResult.getAllErrors().forEach(e -> logger.error("error=[{}]", e.getDefaultMessage()));

        return "person";
    }
}
- エラーメッセージは、resources directory配下に、messages.propertiesで以下の内容で作成
以下のキーに例えば「validation」とかの接頭語を付けたいのですが、方法が?です。
# for form column of error message
firstName=名
lastName=姓
age=年齢
birthDay=誕生日
salary=給与
# for validation error message
NotEmpty={0}は、必須です。
Max={0}は、{1}文字までで入力してください。
Max.personForm.age={0}は、{1}歳までで入力してください。
Digits={0}は、整数部{2}文字で入力してください。
Past={0}は、過去の日を入力してください。
typeMismatch.personForm.java.lang.Integer={0}は、数値で入力してくださいね。
typeMismatch.personForm.age={0}は、数値で入力してください。
typeMismatch.java.math.BigDecimal={0}は、金額で入力してください
typeMismatch.java.time.LocalDate={0}は、日付けを入力してください
コードは、アップ
https://github.com/tomoTaka01/spring-mvc-sample
カスタムバリデーションも作成したいです!
修正したコードを再起動なしで反映する
Spring Boot ではbuild.gradleにdevtoolsを追加するだけ
dependencies {
	runtime('org.springframework.boot:spring-boot-devtools')
}
[ctrl]+[command]+a


Spring Boot Config Server Sample
Cloud Config Server Sample
As of Spring Boot Version 2.0.0.M7(2017-12-22)
Spring Boot Version 2.0.0.M7時点でのサンプル
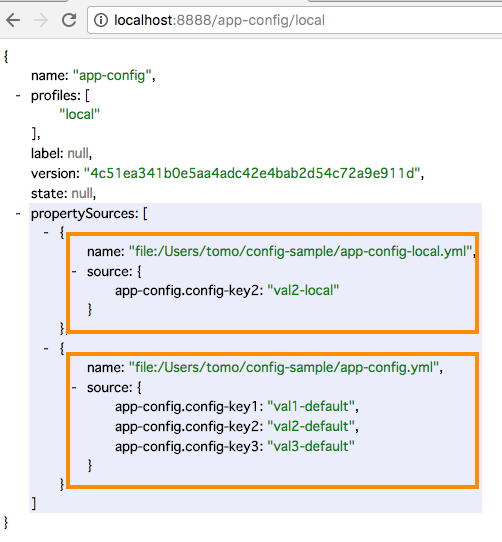
設定ファイル(ymlファイル)は、ローカルの以下の場所より取得
application.yml
server:
  port: 8888
spring:
  cloud:
    config:
      server:
        git:
uri: file:${HOME}/config-sampleローカルマシーンの上記で指定下場所の以下のファイルを置いておきます
この時にこのdirectoryがgitとして管理されています(githubからも取得できます)

アプリを起動して以下のurlで上記ファイルより設定が取得できていることが確認できます
http://localhost:8888/app-api/local

http://localhost:8888/app-config/local
コードは、gitにアップしています
GitHub - tomoTaka01/config-server: Spring Boot Config Server Sample
Spring Boot Multiple yml with profiles
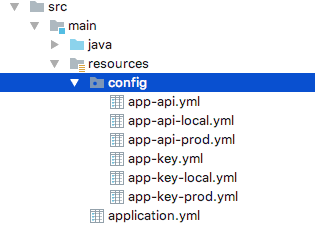
I just wanted to use multiple config(app-key.yml, app-api.yml) for each environment.
複数の設定ファイル(例:app-key.yml, app-api.yml)を各環境ごとで使用できるようにしています。
each file has the below value
各ファイルの値は以下のようにしています
app-key.yml
| environment | default | local | prod |
| key | val-default | ||
| key1 | val1-default | val1-local | |
| key2 | val2-default | val2-prod |
app-api.yml
| environment | default | local | prod |
| timeout | 3 | ||
| retry-count | 1 | 5 | 3 |
local環境を設定して起動した時の値を表示
The below shows the value for local environment.
--spring.profiles.active=local

prod環境を設定して起動した時の値を表示
The below shows the value for prod environment.
--spring.profiles.active=prod

default設定を基本的には使用し、環境ごとの設定を上書きするために以下のように@PropertySourceで、デフォルトファイル、上書きするために環境(profile)に依存したファイルを設定
You can use PropertySource annotation which has two files, to override default file using the second one.
AppKeyConfig.java
@Configuration
@PropertySource({"classpath:/config/app-key.yml","classpath:/config/app-key-${spring.profiles.active}.yml"})
@ConfigurationProperties
public class AppKeyConfig {
    private String key;
    private String key1;
    private String key2;
...
AppApiConfig.java
@Configuration
@PropertySource({"classpath:/config/app-api.yml","classpath:/config/app-api-${spring.profiles.active}.yml"})
@ConfigurationProperties
public class AppApiConfig {
    private int timeout;
    private int retryCount;
...
テスト時には、@SpringBootTestアノテーションで環境を指定できます。
When testing, @SpringBootTest(properties = "spring.profiles.active=local") works fine.
@RunWith(SpringRunner.class)
@SpringBootTest(properties = "spring.profiles.active=local")
public class AppKeyConfigLocalTest {
    @Autowired
    private AppKeyConfig appKeyConfig;

    @Test
    public void keyShouldBeDefaultValue(){
        String key = appKeyConfig.getKey();
        assertThat(key).isEqualTo("val-default");
    }
    @Test
    public void key1ShouleBeLocalValue(){
        String key1 = appKeyConfig.getKey1();
        assertThat(key1).isEqualTo("val1-local");
    }
...
code is here
github.com
Spring Boot Multiple Application Runner
This is very simple example using Spring Boot with 2 stand alone application in 1 project.
The point is you need Java config class and a class which implements ApplicationRunner Interface(or CommandLineRunner) for each job.
And use @ConditionalOnProperty as parameter when execute this.
Moreover if you want it to exit with execution's status like 0 or 1, just throw RuntimeException implements ExitCodeGenerator Interface throws exit code.
- Java config
- ApplicationRunner
- package tree

- TaskSuccess execution log
java -jar build/libs/demo-0.0.1-SNAPSHOT.jar --task=success
You can see the arguments [--task=success] in the log.

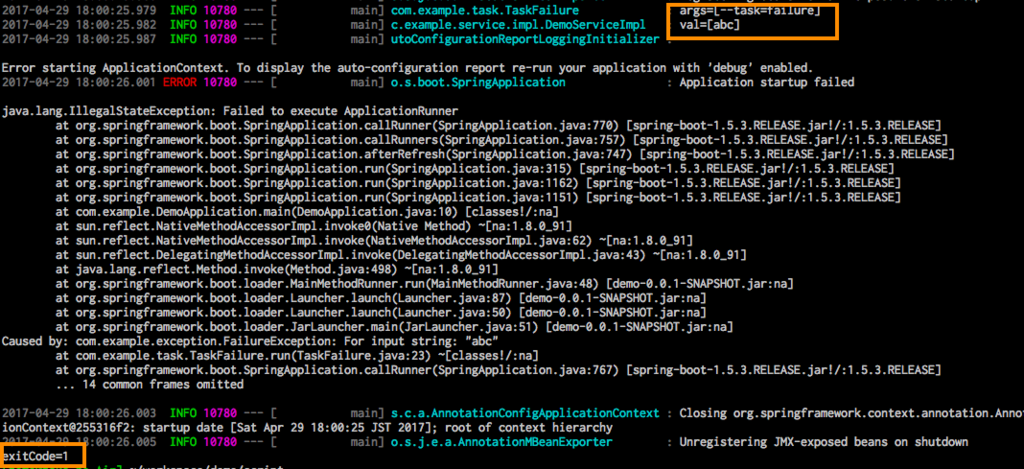
- TaskFailure execution log
java -jar build/libs/demo-0.0.1-SNAPSHOT.jar --task=failure
You can see the exit code is 1:Failure in the log.
- DemoApplication.java
@SpringBootApplication
public class DemoApplication {
	public static void main(String[] args) {
		SpringApplication.run(DemoApplication.class, args);
	}
}
TaskSuccess
- TaskSuccessConfig.java
@Configuration
@ConditionalOnProperty(name={"task"}, havingValue="success")
public class TaskSuccessConfig {
    @Bean
    public ApplicationRunner getRunner() {
        return new TaskSuccess();
    }
}
- TaskSuccess.java
public class TaskSuccess implements ApplicationRunner {
    private static final Logger logger = LoggerFactory.getLogger(TaskSuccess.class);
    @Autowired
    private DemoService demoService;
    @Override
    public void run(ApplicationArguments args) throws Exception {
        logger.info("args=[{}]", args.getSourceArgs());
        try {
            demoService.convertInt("123");
        } catch (Exception e) {
            throw new FailureException(e.getMessage());
        }
    }
}
TaskFailure
- TaskFailureConfig.java
@Configuration
@ConditionalOnProperty(name = { "task" }, havingValue = "failure")
public class TaskFailureConfig {
    @Bean
    public ApplicationRunner getRunner() {
        return new TaskFailure();
    }
}
- TaskFailure.java
public class TaskFailure implements ApplicationRunner {
    private static final Logger logger = LoggerFactory.getLogger(TaskFailure.class);
    @Autowired
    private DemoService demoService;
    @Override
    public void run(ApplicationArguments args) throws Exception {
        logger.info("args=[{}]", args.getSourceArgs());
        try {
            demoService.convertInt("abc");
        } catch (Exception e) {
            throw new FailureException(e.getMessage());
        }
    }
}
common class
- FailureException.java
public class FailureException extends RuntimeException implements ExitCodeGenerator {
    private static final long serialVersionUID = 1L;
    public FailureException(String message) {
        super(message);
    }
    @Override
    public int getExitCode() {
        return 1; // you can set the exit code here
    }
}
- DemoServiceImpl.java
@Service
public class DemoServiceImpl implements DemoService {
    private static final Logger logger = LoggerFactory.getLogger(DemoServiceImpl.class);
    @Override
    public void convertInt(String val) {
        logger.info("val=[{}]", val);
        Integer intVal = Integer.valueOf(val);
        logger.info("int val=[{}]", intVal);
    }
}
whole code is here.
github.com
I really enjoy coding with Spring Boot!!!
keep coding ;-)