File Tree View Sample(Part 2)
I added the following functions to the previous sample application.File Tree View Sample - tomoTakaの日記
1. The context menu to expand tree item, delete directory or add new directory(Figure 1)
2. The context menu to delete file and the dialog to confirm it.(Figure 2, 3)
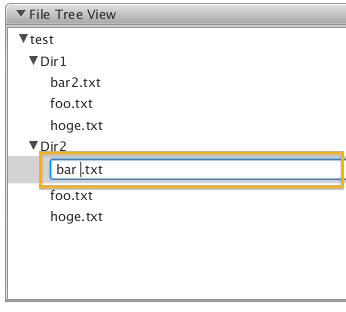
3. Editing the tree item(Renaming files or directories name) (Figure 4)
This code shows you how to use NIO2 to deal with above operations as well.
(see Using JavaFX UI Controls: Tree View | JavaFX 2 Tutorials and Documentation for more details)
- Figure 1 (The context menu for directories)
- Figure 2 (The context menu for files)
- Figure 3 (The dialog for deleting directories or files)
- Figure 4 (Editing the files name)
- Code 1 (PathTreeCell.java)
Instantiate the Expand Menuitem and set the action.
        MenuItem expandMenu = new MenuItem("Expand");
        expandMenu.setOnAction(new EventHandler<ActionEvent>() {
            @Override
            public void handle(ActionEvent t) {
                getTreeItem().setExpanded(true);
            }
        });
Instantiate the Expand All Menuitem and set the action.
        MenuItem expandAllMenu = new MenuItem("Expand All");
        expandAllMenu.setOnAction(new EventHandler<ActionEvent>() {
            @Override
            public void handle(ActionEvent t) {
                expandTreeItem(getTreeItem());
            }
            private void expandTreeItem(TreeItem<PathItem> item) {
                if (item.isLeaf()){
                    return;
                }
                item.setExpanded(true);
                ObservableList<TreeItem<PathItem>> children = item.getChildren();
                for (TreeItem<PathItem> child : children) {
                    if (!child.isLeaf()) {
                        expandTreeItem(child);
                    }
                }
            }
        });
Instantiate the Add Directory Menuitem and set the action.
Creating new directory named newDirectory1 by Files#createDirectory method. Then create node with it and add the node to the tree item as a child.
        MenuItem addMenu = new MenuItem("Add Directory");
        addMenu.setOnAction(new EventHandler<ActionEvent>() {
            @Override
            public void handle(ActionEvent t) {
                Path newDir = createNewDirectory();
                if (newDir != null) {
                    TreeItem<PathItem> addItem = PathTreeItem.createNode(new PathItem(newDir));
                    getTreeItem().getChildren().add(addItem);
                }
            }
            private Path createNewDirectory() {
                Path newDir = null;
                while (true) {
                    Path path = getTreeItem().getValue().getPath();
                    newDir = Paths.get(path.toAbsolutePath().toString(), "newDirectory" + String.valueOf(getItem().getCountNewDir()));
                    try {
                        Files.createDirectory(newDir);
                        break;
                    } catch (FileAlreadyExistsException ex) {
                        continue;
                    } catch (IOException ex) {
                        cancelEdit();
                        messageProp.setValue(String.format("Creating directory(%s) failed", newDir.getFileName()));
                        break;
                    }
                }
                    return newDir;
            }
        });
Instantiate the Delete Menuitem and set the action.
When you click the delete Menuitem the modal dialog shows up to confirm it. If you chose the [OK] button, the prop's propertyChange event gets fired with the target path.
Then delete the directory or file by Files#walkFileTree method in the prop changed method. I am not sure that using the property for communicating with the dialog is a good way.....
        MenuItem deleteMenu =new MenuItem("Delete");
        deleteMenu.setOnAction(new EventHandler<ActionEvent>() {
            @Override
            public void handle(ActionEvent t) {
                ObjectProperty<TreeItem<PathItem>> prop = new SimpleObjectProperty<>();
                new ModalDialog(owner, getTreeItem(), prop);
                prop.addListener(new ChangeListener<TreeItem<PathItem>>() {
                    @Override
                    public void changed(ObservableValue<? extends TreeItem<PathItem>> ov, TreeItem<PathItem> oldItem, TreeItem<PathItem> newItem) {
                        try {
                            Files.walkFileTree(newItem.getValue().getPath(), new VisitorForDelete());
                            if (getTreeItem().getParent() == null){
                                // when the root is deleted how to clear the TreeView???
                            } else {
                                getTreeItem().getParent().getChildren().remove(newItem);
                            }
                        } catch (IOException ex) {
                            messageProp.setValue(String.format("Deleting %s failed", newItem.getValue().getPath().getFileName()));
                        }
                    }
                });
            }
        });
Adding the above Menuitems to the context menu for directory and file.
        dirMenu.getItems().addAll(expandMenu, expandAllMenu, deleteMenu, addMenu);
        fileMenu.getItems().addAll(deleteMenu);
How to set the context menu
In updateItem method you should add the context menu to directory or file.
    @Override
    protected void updateItem(PathItem item, boolean empty) {
        super.updateItem(item, empty);
        if (empty) {
            setText(null);
            setGraphic(null);
        } else {
            if (isEditing()) {
                if (textField != null) {
                    textField.setText(getString());
                }
                setText(null);
                setGraphic(textField);
            } else {
                setText(getString());
                setGraphic(null);
                if (!getTreeItem().isLeaf()) {
                    setContextMenu(dirMenu);
                } else {
                    setContextMenu(fileMenu);
                }
            }
        }
    }
Editing the tree item.
When you start editing the tree item startEdit method called. So you should hold the editing item(editingPath in this code).
When you finish editing commitEdit method is called.
When you add the tree item startEdit and commitEdit method is called as well.
If textField is null it means you are adding it then you should create a tree item(see createTextField method)
If editingPath is not null it means you are editing so rename the path by FIles#move method in commitEdit method.
    @Override
    public void startEdit() {
        super.startEdit();
        if (textField == null){
            createTextField();
        }
        setText(null);
        setGraphic(textField);
        textField.selectAll();
        if (getItem() == null) {
            editingPath = null;
        } else {
            editingPath =getItem().getPath();
        }
    }

    @Override
    public void commitEdit(PathItem pathItem) {
        // rename the file or directory
        if (editingPath != null) {
            try {
                Files.move(editingPath, pathItem.getPath());
            } catch (IOException ex) {
                cancelEdit();
                messageProp.setValue(String.format("Renaming %s filed", editingPath.getFileName()));
            }
        }
        super.commitEdit(pathItem);
    }

    @Override
    public void cancelEdit() {
        super.cancelEdit();
        setText(getString());
        setGraphic(null);
    }

    private String getString() {
        return getItem().toString();
    }

    private void createTextField() {
        textField = new TextField(getString());
        textField.setOnKeyReleased(new EventHandler<KeyEvent>() {
            @Override
            public void handle(KeyEvent t) {
                if (t.getCode() == KeyCode.ENTER){
                    Path path = Paths.get(getItem().getPath().getParent().toAbsolutePath().toString(), textField.getText());
                    commitEdit(new PathItem(path));
                } else if (t.getCode() == KeyCode.ESCAPE) {
                    cancelEdit();
                }
            }
        });
    }
}
- Code 2 (ModalDialog.java)
How to create the modal dialog.
The prop's change event gets fired if you click the [OK] button.
public class ModalDialog {
    public ModalDialog(Stage owner, final TreeItem<PathItem> treeItem, final ObjectProperty<TreeItem<PathItem>> prop) {
        final Stage dialog = new Stage(StageStyle.UTILITY);
        dialog.initOwner(owner);
        dialog.initModality(Modality.APPLICATION_MODAL);
        GridPane root = new GridPane();
        root.setPadding(new Insets(30));
        root.setHgap(5);
        root.setVgap(10);
        Label label = new Label("Are you sure?");
        Button okButton = new Button("OK");
        okButton.setOnAction(new EventHandler<ActionEvent>() {
            @Override
            public void handle(ActionEvent t) {
                prop.set(treeItem);
                dialog.hide();
            }
        });
        Button cancelButton = new Button("Cancel");
        cancelButton.setOnAction(new EventHandler<ActionEvent>() {
            @Override
            public void handle(ActionEvent t) {
                dialog.hide();
            }
        });
        root.add(label, 0, 0, 2, 1);
        root.addRow(1, okButton, cancelButton);
        dialog.setScene(new Scene(root));
        dialog.show();
    }
}
- Code 3 (VisitorForDelete.java)
Deleting files and directories.
You should delete all files under the director first.
This code shows you how to delete files or directories. It is easy thanks to the new NIO2.
public class VisitorForDelete extends SimpleFileVisitor<Path>{

    @Override
    public FileVisitResult visitFile(Path file, BasicFileAttributes attrs) throws IOException {
        Files.deleteIfExists(file);
        return FileVisitResult.CONTINUE;
    }

    @Override
    public FileVisitResult postVisitDirectory(Path dir, IOException exc) throws IOException {
        Files.deleteIfExists(dir);
        return FileVisitResult.CONTINUE;
    }
}
- Code 4 (FileTreeViewSample.java)
The cell factory is used to change tree item dynamically or add or delete it on demand.
    fileTreeView.setEditable(true);
    fileTreeView.setCellFactory(new Callback<TreeView<PathItem>, TreeCell<PathItem>>(){
    @Override
    public TreeCell<PathItem> call(TreeView<PathItem> p) {
        return new PathTreeCell(stage, messageProp);
        }
    });
The whole code is here tomoTaka01/FileTreeViewSample: JavaFX File ... - GitHub
keep coding....


